

The Softest Gluten-Free Bread
- Delightful Bites
- Apr 25, 2024
- 5 min read


Get ready to indulge in the sheer joy of homemade gluten-free bread! Picture this: each slice is a delicate balance of softness and fluffiness, with a texture that's simply irresistible. I've carefully selected brown gluten-free flour for this recipe, though you can easily swap it with white flour if you prefer. The beauty of this bread lies in its simplicity – just a few basic ingredients and straightforward steps, perfect for bakers of any skill level. Treat yourself and your loved ones to the delightful experience of baking and enjoying your very own gluten-free bread!
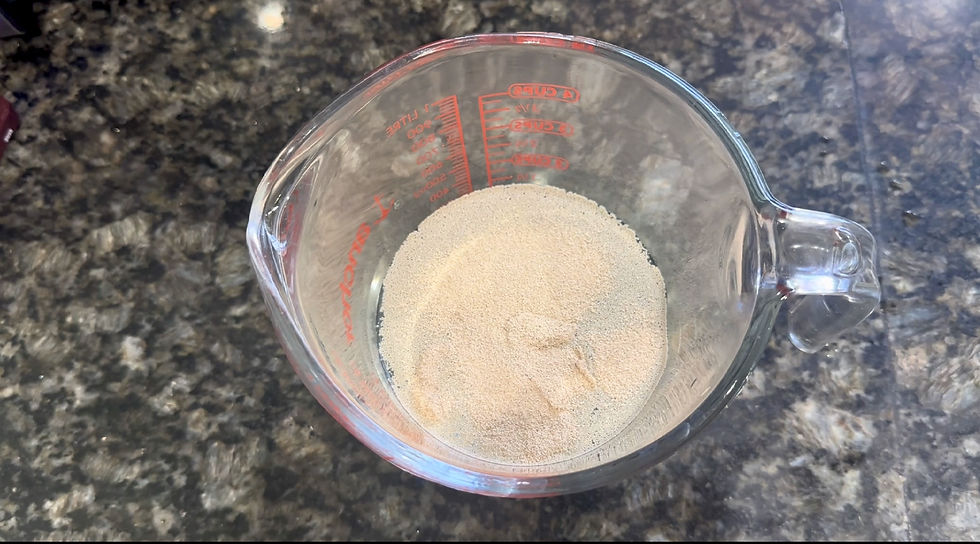
Step 1: Activate the Yeast
In a bowl, combine 300 ml of warm water, 2 tablespoons of granulated sugar, and 14 grams of yeast.
Stir gently to dissolve the sugar and yeast.
Let the mixture sit for about 5-10 minutes until it becomes frothy and bubbly. This indicates that the yeast is activated.
Step 2: Prepare the Mixtures
In a large mixing bowl, combine 400 grams of gluten-free flour (brown or white), 1 teaspoon of salt, and 1 teaspoon of xanthan gum.
In another bowl, Add 5 tablespoons of vegetable oil, 2 large eggs, and 1 teaspoon of apple cider vinegar. Mix well using a whisk until even and fluffy.
In the bowl of dry ingredients, add the yeast mixture and the Egg mixture and mix until there are no visible clumps.
Step 3: Grease the Pan
Get a loaf pan which isn't too wide in length but more on the taller side. Using oil lightly grease the pan to prevent the bread from sticking.
Step 4: Shape the Dough
Scoop out all of the dough into the pan. Using a spatula, shape the top of the dough so it looks flat and cleaner.
Step 5: Proof the Dough
Cover the loaf pan with a clean kitchen towel or plastic wrap.
Allow the dough to rise in a warm, draft-free place for about 2 hours, or until it doubles in size. Gluten-free dough is known to not rise as much compared to regular dough.
Step 6: Bake the Bread
Preheat your oven to 370°F (187°C).
Once the dough has risen, place the loaf pan in the preheated oven.
Bake for 50-55 minutes, or until the bread is golden brown on top and sounds hollow when tapped on the bottom.
Remove the bread from the oven and let it cool in the pan for a few minutes before transferring it to a wire rack to cool completely.
Step 7: Enjoy!
Slice the bread once it's completely cooled.
Serve it fresh with your favorite toppings or use it to make sandwiches, toast, or any other delicious creations you desire.
Enjoy the homemade goodness of your freshly baked gluten-free bread!
Step-By-Step Guide with Images:
Step 1: Activate the Yeast
In a bowl, combine 300 ml of warm water, 2 tablespoons of granulated sugar, and 14 grams of yeast. The water should be warm enough that when you put your finger in it feels warm to the touch but your finger doesn't burn from pain. Stir gently to dissolve the sugar and yeast. Let the mixture sit for about 5-10 minutes until it becomes frothy and bubbly. This indicates that the yeast is activated.
Step 2: Prepare the Dough
In a large mixing bowl, combine 400 grams of gluten-free flour (brown or white), 1 teaspoon of salt, and 1 teaspoon of xanthan Gum. Many recipes use psyllium husk and truly either or do the job. However xanthan gum makes the dough combine better which is why I used this as opposed to psyllium husk. I Used brown gluten free flour but you can substitute it with white, using the same quantity.

In another bowl whip the 5 tablespoons of vegetable oil, 2 large eggs, and 1 teaspoon of apple cider vinegar.

After its mixed well add the egg mixture and yeast mixture into the Dry ingredients. Using a wooden dowel or spatula mix well so there are no visible clumps.


This is a no-knead dough so the batter is supposed to be a little runny, a little like cake batter. Mix well until all the ingredients are fully combined and a smooth dough forms.
Step 3: Prepare the pan
Grease a standard-sized loaf pan with vegetable oil or non-stick cooking spray to prevent the bread from sticking.Ensure that the loaf pan is appropriately sized; it shouldn't be too long, as this can result in a shorter loaf of bread. A standard-sized loaf pan will help the bread rise evenly and maintain its desired shape during baking.

Step 4: Shape the Dough
Scoop all of the dough into the loaf. Using a spatula, even out the top of the dough so it looks even. This will also aid in creating an evenly baked bread.

Step 5: Proof the Dough
Cover the loaf pan with a clean kitchen towel or plastic wrap.
Allow the dough to rise in a warm, draft-free place for about 4 hours or until it doubles in size.

Step 6: Bake the Bread
Preheat your oven to 370°F (187°C).
Once the dough has risen, place the loaf pan in the preheated oven.
Bake for 50-55 minutes, or until the bread is golden brown on top and sounds hollow when tapped on the bottom.
Remove the bread from the oven and let it cool in the pan for a few minutes before transferring it to a wire rack to cool completely. Before transferring, use a knife to release the sides so the bread comes out easily.

Step 7: Enjoy!
Slice the bread once it's completely cooled.
Serve it fresh with your favorite toppings or use it to make sandwiches, toast, or any other delicious creations you desire. This combines well with eggs or even jam, perfect for any breakfast sandwich.


Recipe:

Additional Information:
Use water that is comfortably warm to the touch, around 110-115°F (43-46°C), to activate the yeast effectively.
Make sure the water is not too hot, as it can kill the yeast, nor too cold, as it won't activate the yeast properly.
Allow the yeast mixture to sit undisturbed in a warm, draft-free environment. This encourages yeast activity and ensures a good rise in the dough. Even placing it in an oven that is not on or a microwave can ensure the best proof.
To check if the dough has proofed enough, gently press your finger into the dough. If the indentation remains and slowly fills back in, it's ready for baking. If it springs back immediately, it needs more time to proof.
Use eggs at room temperature for best results. Cold eggs can slow down the fermentation process.
When measuring gluten-free flour, avoid packing it into the measuring cup. Instead, spoon the flour into the cup and level it off with a knife for an accurate measurement.
Gluten-free flours vary in their absorption rates, so be prepared to adjust the amount of liquid in the recipe accordingly. The dough should be soft and slightly sticky, but not too wet or dry. for this specific recipe, the dough should be like a cake batter.
Find the video on how to make the softest gluten free bread here:


Comments